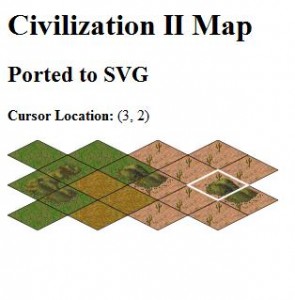
SVG – Civilization II
 This prototype loads an HTML document that displays an interactive Scalable Vector Graphic (SVG) image. You are able to click on the different tiles of the map, which will move your blinking white cursor to the tile that you clicked. The game grid itself is loaded from the XML data below:
<?xml version="1.0" encoding="utf-8"?>
<?xml-stylesheet href="game.xsl" type="text/xsl"?>
<game>
  <map width="5" height="5">
    <cursor x="1" y="1" />
    <tile x="0" y="0" type="grassland" />
    <tile x="0" y="1" type="grassland" hills="Yes" />
    <tile x="0" y="2" type="grassland" hills="Yes" />
    <tile x="0" y="3" type="grassland" hills="Yes"/>
    <tile x="0" y="4" type="grassland" />

    <tile x="1" y="0" type="grassland" />
    <tile x="1" y="1" type="grassland" hills="Yes" />
    <tile x="1" y="2" type="plains" />
    <tile x="1" y="3" type="plains" />
    <tile x="1" y="4" type="plains" />

    <tile x="2" y="0" type="desert" />
    <tile x="2" y="1" type="desert" />
    <tile x="2" y="2" type="desert" hills="Yes" />
    <tile x="2" y="3" type="desert" />
    <tile x="2" y="4" type="desert" />

    <tile x="3" y="0" type="desert" />
    <tile x="3" y="1" type="desert" />
    <tile x="3" y="2" type="desert" hills="Yes" />
    <tile x="3" y="3" type="desert" hills="Yes" />
    <tile x="3" y="4" type="desert" />
  </map>
</game>
The XML data is parsed using an XSL Translation. The result is an SVG file like the one below.
<svg:svg
    xmlns:svg="http://www.w3.org/2000/svg"
    xmlns:xlink="http://www.w3.org/1999/xlink"
    width="620" height="160">
  <svg:defs>
    <svg:mask id="tileMask" maskUnits="userSpaceOnUse" x="0" y="0"
        width="$tileWidth" height="$tileHeight">
      <svg:polygon points="32,0 64,16 32,32 0,16"/>
    </svg:mask>
    <svg:clipPath id="tileClipPath">
      <svg:path d="M0 16 L32 0 L64 16 L32 32 L0 16 Z" clip-rule="even-odd"/>
    </svg:clipPath>
  </svg:defs>

  <svg:g id="grid" stroke="black" stroke-width=".5">
    <svg:g transform="translate(0,0)" onclick="moveCursor(0,0)">
      <svg:image x="0" y="0" height="32" width="64" clip-path="url( #tileClipPath )"
          xlink:href="display/terrain/grassland/tile.gif" />
    </svg:g>
    <svg:polygon points="32,0 64,16 32,32 0,16" fill-opacity=".1"/>

    <svg:g transform="translate(32,16)" onclick="moveCursor(0,1)">
      <svg:image x="0" y="0" height="32" width="64" clip-path="url( #tileClipPath )"
          xlink:href="display/terrain/grassland/tile.gif"/>
      <svg:image x="0" y="0" height="32" width="64" clip-path="url( #tileClipPath )"
          xlink:href="display/terrain/grassland/hills/8.gif"/>
    </svg:g>
    <svg:polygon points="32,0 64,16 32,32 0,16" fill-opacity=".1"/>

    ...

    <svg:g transform="translate(224,48)" onclick="moveCursor(3,3)">
      <svg:image x="0" y="0" height="32" width="64" clip-path="url( #tileClipPath )"
          xlink:href="display/terrain/desert/tile.gif"/>
      <svg:image x="0" y="0" height="32" width="64" clip-path="url( #tileClipPath )"
          xlink:href="display/terrain/desert/hills/1.gif"/>
    </svg:g>
    <svg:polygon points="32,0 64,16 32,32 0,16" fill-opacity=".1"/>

    <svg:g transform="translate(192,64)" onclick="moveCursor(3,4)">
      <svg:image x="0" y="0" height="32" width="64" clip-path="url( #tileClipPath )"
          xlink:href="display/terrain/desert/tile.gif"/>
    </svg:g>
    <svg:polygon points="32,0 64,16 32,32 0,16" fill-opacity=".1"/>

  </svg:g>
  <svg:g id="cursor" stroke="white" stroke-width="2" fill="none"
      transform="translate(96,16)">
    <svg:polygon points="32,0 64,16 32,32 0,16"/>
  </svg:g>
</svg:svg>
One of the cool things that the XSL Translation does, is it detects adjacent terrain formations (i.e. – hills). As you can see in the image above, each individual tile that contains hills is rendered differently. For example, a tile that has 2 adjacent hills will look different than a tile that has only 1 adjacent hill. Adjacencies can occur in four (4) different directions: Northwest, Northeast, Southeast, and Southwest.
All in all, there are 16 different combinations of adjacent tiles. If each direction is represented by a binary number such that NE = 0×0001, NW = 0×0010, SE = 0×0100, and SW = 0×1000, then all possible adjacendies can be represented by the binary numbers from 0×0000 to 0×1111. By testing each adjacent square and toggling the pertaining ‘bit’ in the binary number if the terrain matches, we can determine exactly how to render the tile. The filename of the image placed in the tile corresponds with the resulting number, meaning if all adjacent squares had hills the resulting binary number would be 0×1111 (16), so “hills/16.gif” would be placed in the tile.
The XSL Translation handles this adjacency with the following snippet of code.
<xsl:variable name="tileNorth">
  <xsl:choose>
    <xsl:when test="../tile[@x=$tileX and @y=$tileY - 1]/@hills = 'Yes'">
      <xsl:number value="1" />
    </xsl:when>
    <xsl:otherwise>
      <xsl:number value="0" />
    </xsl:otherwise>
  </xsl:choose>
</xsl:variable>

<xsl:variable name="tileSouth">
  <xsl:choose>
    <xsl:when test="../tile[@x=$tileX + 1 and @y=$tileY + 1]/@hills = 'Yes'">
      <xsl:number value="2" />
    </xsl:when>
    <xsl:otherwise>
      <xsl:number value="0" />
    </xsl:otherwise>
  </xsl:choose>
</xsl:variable>

<xsl:variable name="tileEast">
  <xsl:choose>
    <xsl:when test="../tile[@x=$tileX +1 and @y=$tileY - 1]/@hills = 'Yes'">
      <xsl:number value="4" />
    </xsl:when>
    <xsl:otherwise>
      <xsl:number value="0" />
    </xsl:otherwise>
  </xsl:choose>
</xsl:variable>

<xsl:variable name="tileWest">
  <xsl:choose>
    <xsl:when test="../tile[@x=$tileX and @y=$tileY + 1]/@hills = 'Yes'">
      <xsl:number value="8" />
    </xsl:when>
    <xsl:otherwise>
      <xsl:number value="0" />
    </xsl:otherwise>
  </xsl:choose>
</xsl:variable>

<svg:image x="0" y="0" height="32" width="64"
    xlink:href="display/terrain/{@type}/hills/{$tileNorth+$tileSouth+$tileEast+$tileWest}.gif" />